Additel ADT875-1210 and ADT878-1210 Thermocouple Calibration Furnace
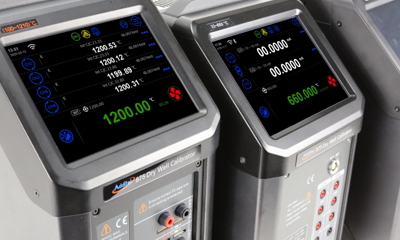
ADT875-1210 and ADT878-1210 for Thermocouple Calibration, cover temperatures 100℃ to 1210℃ . With an unmatched stability, uniformity and an optional on-board process calibrator, calibrating thermocouples has never been easier. The ADT875-1210 and ADT878-1210 furnaces include a patented multi-zone temperature control provides a never before seen, highly stable and uniform heat source to ensure you get the best possible results.


General Information
Specifications
Process Calibrator Option
General Information
Key Features:
- Two Models Available:
-
- ADT875-1210: 100℃ to 1210 ℃
- ADT878-1210: 100℃ to 1210 ℃
-
- Temperature control from 100°C to 1210°C
- Display Accuracy: ±1.5°C (ADT878), ±2°C (ADT875)
- Stability of ±0.1°C
- Axial uniformity: ±1°C (ADT878), ±1.5°C (ADT875)
- Radial uniformity: ±0.8°C (ADT878), ±1°C (ADT875)
- 5 on-board measurement channels (1 x REF Channel, 4 x UUT Channels)
- Portable, rugged, and quick to temperature
- Multi-zone temperature control
- Internal and external sensor control
- Self-calibration feature (PC Option only)
- Wi-Fi and Bluetooth capable
- Color touch screen display
- ISO 17025-accredited calibration w/data included
- Metallic Interchangeable inserts
- Cooling Time = 50 min: 1210°C to 300°
- Time to Stability = 15 Minutes
- Resolution 0.01°C
- Weight = 10.6 kg (23.4 lbs.)
- Power = 115 V AC (±10%) or 230 V AC (±10%), switchable, 45-65 Hz, 580 W
- Communications = USB A, USB B, RJ45, Wi-Fi, Bluetooth
Applications:
- Thermocouple Calibration
- Temperature transmitter calibration
- Annealing/heat treating
- High temperature PRT calibration
- Industrial temp sensor verification
MAXIMATOR specialises in supporting your business further by offering the following:
- Customised reports
- Local Technical support
- Customised calibration packages
Specifications

| General Specifications | ||
|---|---|---|
| 875-1210 | 878-1210[1] | |
| Temperature Range | 100°C to 1210°C | |
| Display Accuracy | ±1.2°C @ 100°C | ±1.0°C @ 100°C |
| ±1.2°C @ 300°C | ±1.0°C @ 300°C | |
| ±1.2°C @ 600°C | ±1.0°C @ 600°C | |
| ±1.6°C @ 900°C | ±1.2°C @ 900°C | |
| ±2.0°C @ 1210°C | ±1.5°C @ 1210°C | |
| Stability | ±0.1°C | |
| Axial Uniformity (20mm zone) | ±0.6°C @ 100°C | ±0.4°C @ 100°C |
| ±1.2°C @ 300°C | ±0.8°C @ 300°C | |
| ±1.5°C @ 600°C | ±1°C @ 600°C | |
| ±1.5°C @ 900°C | ±1°C @ 900°C | |
| ±1.5°C @ 1210°C | ±1°C @ 1210°C | |
| Radial Uniformity | ±0.2°C @ 100°C | ±0.2°C @ 100°C |
| ±0.3°C @ 300°C | ±0.3°C @ 300°C | |
| ±0.4°C @ 600°C | ±0.4°C @ 600°C | |
| ±0.8°C @ 900°C | ±0.6C @ 900°C | |
| ±1°C @ 1210°C | ±0.8°C @ 1210°C | |
| Loading Effect | ±0.5°C | |
| Environmental Conditions | 8°C to 38°C guaranteed accuracy | |
| 0°C to 50°C, 0% to 90% RH non-condensing, | ||
| 3000 M altitude for normal operation | ||
| Storage Conditions | -20°C to 60°C | |
| Immersion Depth | XR style inserts = 138 mm (5.43″) | |
| XS style inserts = 116 mm (4.57″) | ||
| (see insert ordering info for more details) | ||
| Insert Size – OD | 24.8 mm (0.98 inches) | |
| Heating Time | 50 min: 23°C to 1210°C | |
| Cooling Time | 50 mins:1210°C to 300°C 50 mins: 300°C to 50°C | 55 mins:1210°C to 300°C 55 mins: 300°C to 50°C |
| Typical Time to Stability | 15 min | |
| Resolution | 0.01°C | |
| Units | °C, °F, and K | |
| Display | 6.5 in (165 mm) color touch screen | |
| Size (H x W x D) | 345 x 170 x 330 mm (13.6 x 6.7 x 13.0 in) | |
| Weight | 10.6 kg (23.4 lbs) | |
| Power Requirements | 115 V AC (±10%) or 230 V AC (±10%), switchable, 45-65 Hz, 580 W | |
| Mechanical Testing | Vibrat ion: 2 g (10-500 Hz) , 30 min for 2 sides | |
| Impact: 4 g three times | ||
| Drop test: 500 mm (19.6 in) | ||
| Communication | USB A, USB B, RJ45, WiFi, Bluetooth | |
| Localization | English, Chinese, Japanese, Russian, German | |
| Warranty | 1 year | |
| [1] 878-1210 specifications require use of an “XR” style insert. Otherwise, default to the 875-1210 specifications. | ||
Process Calibrator Option

ADT875PC-1210 & ADT878PC-1210
- Patented “Quick-Push” Connectors accommodate banana jacks, bare wire, spade, large TC & mini TC
- Measure Reference TC on the Ref Channel
- Measure 4 UUT’s on Channels 1-4
- Ch.1 and Ch.2 – transmitters and switches
- Task Documentation
- Save Data (“As Found” / “As Left”)
- Auto Step Function
- Self-calibration feature – Ref probe required
Enquire about this product
Fill in the enquiry form below and one of our friendly staff will be in touch to discuss your requirements. If you are enquiring about a specific product SKU please refer to the product datasheet and include these details in your enquiry message.
